
how to add subtitles in Capcut on Desktop and Mobile In 2025
How to add subtitles in Capcut. CapCut is a robust video editor that provides a range of tools to help producers enhance their work. One essential element for video editing is the ability to add subtitles. It enhances understanding, audience engagement, and accessibility. In the increasingly international digital world, this is particularly true.
Everything from automated subtitle entry to manual caption production will be covered. Discover how to produce subtitles that follow best standards, are correct, and are visually appealing. From the fundamentals to more sophisticated methods like auto-captions or multi-language support, you will be led through the whole subtitle creation process.
Understanding Captions vs. Subtitles
Usually, they are designed for those who can understand the audio but do not speak the language. Subtitles are used to translate or transcribe speech, but do not describe non-dialogue sounds. Subtitles are often used for multilingual films and videos aimed at international audiences.
Captions offer a richer experience, including both the dialogue and non-verbal audio clues. They can describe background music, sounds and even identify the speaker, making content accessible to those with hearing disabilities.
Subtitles’ Advantages
Your content can be accessed by people with hearing impairments thanks to subtitles. You can ensure that all viewers, regardless of hearing ability, will be able to enjoy and understand your videos by providing a textual version of the spoken dialogue.
Your content can be accessed by people with hearing impairments thanks to subtitles. You can ensure that all viewers, regardless of hearing ability, will be able to enjoy and understand your videos by providing textual representations of spoken dialogue.
Prepare Your Video for Subtitling
Get Your Video Ready for Subtitling Make sure your video is fully edited before adding subtitles. Make all necessary cuts, transitions, and adjustments to avoid having to realign subtitles later. If you change the length or sequence of your video after adding subtitles, it may cause them to become out of sync.
If you want accurate subtitles, you need high-quality audio, especially if you’re using CapCut’s auto-captioning feature. Background noise or unclear dialogue can lead to transcription errors, so during the editing process, try enhancing the audio quality or using less background noise.
Installing and Opening the CapCut
Installing CapCut on a desktop or mobile device is simple. To start editing videos and adding subtitles, install and launch CapCut. Choose the video to subtitle from the gallery or folders on your device.
The video will show up in the timeline and be prepared for editing after importing. After installation, tap the CapCut icon on your desktop or mobile device’s home screen. On the launch screen, there are choices to open or start a new project.
How to use the function with subtitles
Adding subtitles is simple using CapCut’s user-friendly interface. You will learn how to use the subtitles function from this instruction. Bring the video in from the files or gallery on your device. After that, the video will show up at the bottom of the screen in the timeline.
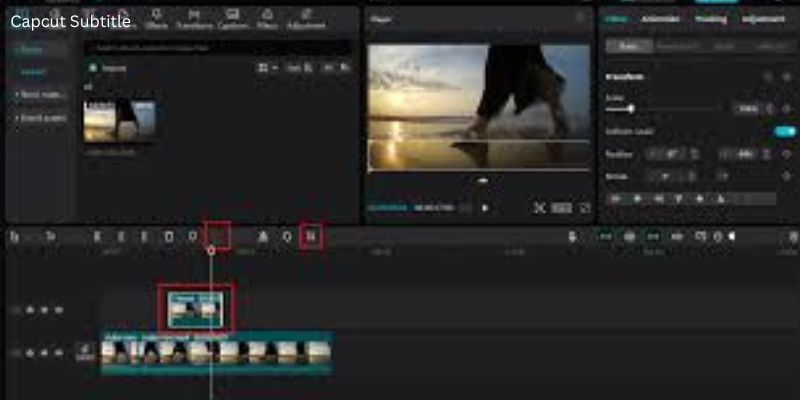
Subtitles by hand: Click “Add Text” to add subtitles by hand. With this technique, you have control over the time, substance, and style of your film. Choose “Auto Captions” to have the video automatically transcribed. Select your preferred language and make sure.
Include Manual Subtitles
With CapCut, you can manually add subtitles and have total control over the material, style, and timing. This is a fantastic method to guarantee correctness and personalize the subtitles to fit the tempo and mood of your film.
Place the text box in the middle of the bottom screen by dragging it there. This is where subtitles are often placed. Verify that it doesn’t impede or conflict with any crucial images.
Use Auto-Captions
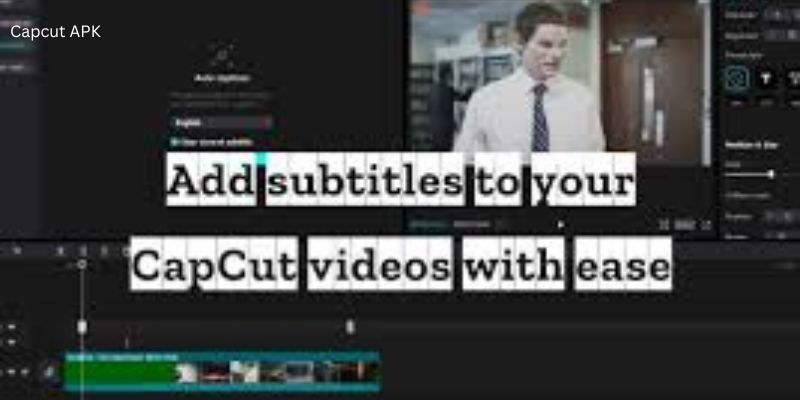
You can save time by using how to add auto subtitles in capcut, which automatically generates subtitles from your video’s audio. This feature is helpful if you have a lot of dialogue to add or if you want to quickly create captions.
Although auto-captions can be very accurate, you should still review and adjust them as needed. Open CapCut, then either create a New Project (or select an existing project) or choose one that has already been created. If you haven’t already, import your video to the timeline.
Customizing Subtitle Styles
Modify the type, backdrop color, and font size to make it easier to read. Simple typefaces on a contrasting backdrop will be easier to see. For your subtitles to be both aesthetically pleasing and simply readable.
CapCut’s style modification function is essential. A professionally created subtitle will keep your film looking professional while improving the viewer’s experience.
Synchronizing subtitles with audio
Align the subtitles with the conversation after dragging the text clips into the timeline. Adjust for pauses or natural emphasis, and zoom for precision. Subtitles and audio must be in perfect sync. One of the most crucial parts of adding subtitles to videos is this.
Synchronizing the text and audio improves the viewing experience. You may either manually or automatically add subtitles with CapCut. After the subtitles are applied, the text on the timeline will match the audio.
Manage Subtitle Transitions and Duration
For viewers to read subtitles easily, they should stay on the screen for a considerable amount of time. Break up lengthy phrases into smaller, easier-to-read sections.
A seamless viewing experience depends on effective management of subtitle transitions and durations. This is particularly true for presentations, movies, and videos with subtitles.
Preview and adjust subtitles
You can identify timing or other mistakes with the use of subtitles. To guarantee a seamless text flow, edit in real time. To ensure that subtitles are understandable, synced, and visually appealing, it is crucial to evaluate and modify them.
Replay the video and verify that the time is accurate. Verify that the conversation or activity on screen corresponds with the subtitles. You can change the time so that the subtitles match the audio within 0.25 seconds if they are too early or stay after the speech has ended.
Exporting Video with Subtitles
Once everything is ready, select “Export.” Make sure “Include Text” is chosen so that the finished product has subtitles. Make sure the resolution you choose is suitable for your platform. You can embed or attach how to add subtitles in Capcut to make sure the subtitles show up appropriately while a video is being played back.
Choose if you would want the subtitles to be permanently included in the video or if you would prefer a selectable separate file, such as SRT or VTT. The platform will determine this. For platforms that do not support independent subtitle files, burned-in subtitles work best. More switching and customisation are possible with separate files.
FAQs on how to add subtitles in Capcut
Conclusion on how to add subtitles in Capcut
Use CapCut to add subtitles to your video. It’s a straightforward procedure that raises professionalism and accessibility. Navigate to the “Text menu” after importing the movie into CapCut’s timeline. The “Add Text” option allows you to how to add subtitles in Capcut pc on iphone. Enter your text and change the font’s size and alignment to fit your video’s aesthetic.
To align the subtitles with the conversation and on-screen activities, use the timeline. This will guarantee a fluid flow. Finally, watch the video again to make sure there are no timing or visual problems. After that, export the project how to add subtitles in Capcut in the preferred format. By following these steps, you may produce professional, captivating material with subtitles to improve the watching experience.